Start by opening the roof (if you can electronically) about 3/4's of the way. At the leading edge, of the roof between the liner and the roof itself, you will find 3 small phillips head screws that need to be loosened, a few turns will achieve this. Then close the roof to less than a 1/4 of the way and pull down on the liner. There are metal tabs that are "U" cut that slip behind the phillips head screws. Slide the liner back some and close the roof the rest of the way. Now you can, though not absolutely necessary, remove the liner by shifting it to one side and pulling down on the other side to pull the liner out. There are (3) pins with felt bottoms that are at the back of the liner. Lift them over the back lip of the headliner. You will have to do some bending of the liner, but don't worry, it's made out of galvanised sheet metal.
With the liner out, all the screws and bolts are exposed. You will see how it all makes sense at this point. Open the sunroof again just enough (about an inch or so), not to pinch the tensored steel pressure springs that hold the liner down. There are (3) and they will now be sticking below the headliner level. Disconnect the battery at this time to save it from wearing down.
To remove the roof, start by unbolting the (4) 8mm hex bolts that are located directly above your head.(2 each side) They attach to hindges on the roof. These bolts are dual fucntioning, they hold the roof to the black cross bar that rides on the track and secures the front corner adjustment screws from turning.
Now go to the sides of the sunroof and you will find that it is attached to guides/shoes that ride along the track. Remove the (4) phillips head screws (2 each side). There are (3) screws per side, but you do not want to unscrew the center screw. You will see that the screws you want to remove are pinching tabs from the sunroof to the guides/shoes. These screws are also your rear roof corner adjustment screws.
Standing next to the car, reach under with one hand and pop the front of the roof up and grab with you other hand carefully pulling up and forward as to not bind the top/back of the sunroof on the fixed roof of the car. Lay the sunroof upside down on a towel or something soft when putting it on a bench or table.
To install a new seal around the sunroof, first remove the rain channel at the back of the roof, held on by (3) phillips head screws. Flip the sunroof over and pull out the old seal. This is in 2 pieces as you will plainly see. The seal is compressed into a channel surrounding the whole sunroof. Pull the seal out directly away from the roof. Inspect the channel for any left over pieces of rubber or trash.
With the new seal (2 pieces), start with the front (long) seal. Fold it in 2 and find the center. With the felt side up, insert the barbed rubber edge of the seal into the front center of the sunroof. (a little saliva helps it slip in pretty easily) Do one side at a time. Work the seal in one direction all the way around the side and the back, then do the otherside starting at the center. (I found that after a few attempts to get the seal to fit correctly when installed, you will need to stretch the seal around the sunroof, since it will be thicker than the seam of the sunroof and fixed roof. This may not be necessary for your car.) Make sure that the front seal reaches around to the back of the sunroof by an inch or more on the straight edge. Take the back seal now and install it. The back seal is thicker and has an extra rubber channel. Cut to fit flush with front seal. Insure that the seal is seated all the way around. Re-install rear rain channel.
Before you put the sunroof back in the car, I HIGHLY recommend the following actions. Clean ALL tracks, guides and moving components. This is probably the single most probelm with slow running/straining sunroofs.
It is best to perform this operation, from what I found, in this order.
1) Remove sunroof motor cover (push back and pull down front, pull rear of cover off of tension spring)
2) Remove motor and insure it works freely (1 phillips screw, 2-8mm nuts) test then unclip connector
3) Remove gearbox (2-8mm nuts) Make sure center flat head screw is tight. The motor and gear box are connected to each other by a rubber shaft that has half circle plastic inserts in it. Make sure that gear box operates freely...spin the shaft, not the gear.
4) Pull the guides/shoes off of the plastic shuttle that rides on the track(if it hasn't already fallen off) and clean them well.
5) Remove the tracks by unscrewing (3) phillips head screws per track/side. You may have to slide the cross bar out of the way to get at the screws. Slowly pull up the front end of the track making sure it does not bind on anything and slip the black cross bar off of the track. Do this on the otherside as well. Put the cross bar off to the side. While lifting up on the front end of the track, slide it out. While doing this, do not pinch the drive cable. Hold the shuttle that is connected to the cable and pull the track out. Also note that the outside of the track has sealant applied to it, it can get messy if you are not careful.
6) Remove the shuttles and cables. These will just pull right out of the cable tunnels that lead to the gearbox area.
Now, clean around the sunroof area removing any debris. Shine a flashlight in the void where the sunroof retracts into to make sure all is clean and clear.
Clean all of the parts you have removed. Essentially you are trying to remove any grease, dirt and what ever that is keeping your roof from operating smoothly.
Tracks:
Clean the inside of the tracks real well, especially in the channel where the "screw cable" sits. Do not remove the sealant on the outside edge unless you plan on redoing this. (was not necessary on mine) I took a scotch pad after cleaning to remove any rough areas or remaining hardened debris on the track surfaces.
Cross bar:
Gently remove the plastic liners (1 per side) in the ends of the cross bar...the piece that slides on the track. They will pry out with a small flat head screw driver...just be careful not to break them. Clean them well and clean the channel on the crossbar that they fit into.
Shuttles/screw cables:
This is probably the single most important thing to clean. Make sure that the inside of the plastic shuttles are free of grease and debris. Wipe those cables down really well. These cables and shuttles are the units that push and pull your sunroof. The cables have a hardened metal spiral around them that the gear from the gearbox grabs when it is turned by the sunroof motor. They slide through a tubed metal tunnel that has a small opening on the inner side where the gearbox is. Pressure from the gear and the outside of the tubes ensure a good mesh on the cables.
NOTE: I expect that the factory used some yellow/gold grease of sorts for the cables that gets hard over time. It may have coated the inside of the tube tunnels. You may want to grease them on re-install. Probably a gear grease. I did not use any since it was not necessary. It was obvious though that Porsche has used some kind of gold colored grease on the cables to enhance movement through the tube tunnels. I believe that there is a common "yellow" grease that is used for small gears, primarily for electrical motors and such, I just don't know what it is called. Any auto parts or hardware store should know.
Cable tunnels:
These can be accessed at the back corners of the void where the sunroof retracts into. I did not have to do much more than running the cable coated with WD40 back and forth several times to loosen up the hardened material. It may be worth your while to use your ingenuity to clean these out better than I did with a thin wired bottle brush, a "snake" of sorts. You want to make sure that the cables move through the tunnels with no binding or hang ups. They should slide easily through them.
After you have completed your messy job of cleaning all the parts, it's time to put it all back together.
The only thing you may need to lubricate is the cable. I cannot recommend anything because I don't know what should be used. I would guess a gold gear grease. Contrary to what you think, the moving parts are not to be lubed, they collect dust and debris which inhibits the operation of the sunroof.
Install the cables/shuttles by sliding them into the tube tunnels.Leave the shuttle part in view to reattach to the track. Use your flashlight for this.
Take the tracks (for the proper side...easy to figure out) and slip the shuttle back onto the track. Push the track all the way back to the tunnel tube. The cable will be held in the track channel and will guide the track to the tunnel tube. Do not push them down all the way yet.
Take your cross bar with the plastic liners re-installed and the tension springs facing down and back, sliding it onto the track. Now, push down on the tracks and align them up with the screw holes, install screws and tighten. The cable/shuttles should slide freely and easily as should the cross bar.
Re Installing the roof:
Slide the cross bar to the front and even up the shuttles behind the square cut outs in the track. Take your guides/shoes and slip the rear of them onto the pin of the shuttle. The guides/shoes will have a pin on them too that faces the inner part of the car. The giudes/shoes do not clip on, just sit them there making sure the pin from the shuttle is in the back slot.
Carefully handling your sunroof, sit it back into the opening installing the rear edge first. While holding the front of the sunroof up, slowly slide it into the void. You will notice that the hindges have fallen down not allowing you to lay the sunroof flat. Push the hindges back underneath itself so that you can lay the roof and hidges onto the crossbar. There is a clip at the front of the sunroof, make sure it is not sitting on top of the other clip mounted to the front of the roof opening on the car.
Get into the car and adjust the roof so that the hindges and front adjustment screws sit properly on the cross bar. The roof should be open an inch or so. Adjust the guides/shoes on the sides so that they are between the track and the sunroof tabs with holes lined up, making sure that the shuttle pins are still in the guide slots.
Start by installing the phillips head screws into the guides/shoes. Do not tighten, leave them looses enough for a little movement and adjustment. Now install the 8mm hex bolts back into the hindges, again leaving them just loose enough for adjustment. Slide the roof forward to close it. Get out of the car and check that your seal has seated well. Reach underneath and push up on the rear of the roof to close it.
Assuming that all is well with the seal, get back in the car to adjust the 4 corners. Chances are, you will not really have to do anything to the front adjustment screws if the front of the sunroof was OK previous to removal. Gently tighten the (4) 8mm hex bolts, do not over tighten. The bolts just need to be snug enough to keep the adjustment screws from turning, while securing the roof to the crossbar.
Go to the sides now to adjust and tighten the phillips head screws. Push up on the sunroof lid to keep it closed and tighten the rear most screw, then the front most screw.
With all these things tightened, pull the roof back a little to make sure it moves freely enough and then close it for the same. Don't worry about final adjustments yet.
Making sure that the roof is completely forward, not necessarily closed at the rear, you just want to make sure that the cable/shuttles are matched up evenly inside with no slack. Install the gearbox making sure the gear meshes with the cables and then install the motor.
Providing your battery is still strong at this point if you haven't disconnected it, turn on the car. Electronically open the roof a little bit. You want to make sure you do not pinch those 3 tension springs.(I went ahead and slipped the 2 outer springs up above the headliner and while opening the roof, held the center one up as to not pinch them. It beats re-installing the liner everytime you make adjustments) Open it all the way checking for smooth operation and closing it all the way for the same. When it is closed completely, get out and look at the sunroof to see if it is flush with the rest of the roof. If not, time to make adjustments. Turn the car off.
You will have to play around a little when adjusting these sunroofs.
Start with the front. Loosen the (4) 8mm hex bolts and turn the flat head screws counter-clockwise to raise the corners and visa versa. One turn makes a difference, so keep checking the height from the outside as you adjust. When you are satisfied with the front height being no more than flush with the rest of the roof, tighten the (4) 8mm hex bolts.
For the rear adjustment, I found that it is easier to open the sunroof a little so that the guides/shoes drop down into the tracks with no pressure on them. Loosen the rear most screws, and if you want to raise the roof, tighten the screw so that it is at the bottom of the looped tab, when the roof is closed, it will push the sunroof up higher. As for the forward most screws in the guides/shoes, if you tighten the screw so that it is at the top of the loop, it will raise the roof higher. (NOTE: I believe this screws sets the height of the rear sunroof edge travel, that will cause or aliviate top side scratching) I set my forward most screws towards the bottom of the looped tab.
All in all, you will need to adjust all of these screws and bolts a few times to get the sunroof to fit flush and not to scratch the topside. Be patient and take your time.
When you have set the roof to your satisfaction, re-install the liner. Close the sunroof all the way and slip the liner back in the same way it came out. Slide it towards the back and open the sunroof about 3/4's of the way. Pull the liner up front to match the leading edge of the roof and feel your way to slip those 3 metal tabs behind the phillips head screws, but in front of the cross bar. Tighten the 2 outer screws first making sure the liner is not pushed too far upwards to the roof. The wind deflector has to fit between the roof and liner when closed.


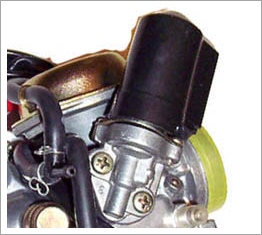 If you are getting a spark and you are getting gas to the carburetor and the engine is turning over on the starter OK, it's possible that the electrically operated automatic choke has failed. It's supposed to operate when the engine is cold, but if it's stuck or burned out, the mixture will be weak and the scooter probably won't start. The automatic choke is usually a black cylindrical object attached to the carburetor with a couple of wires coming out of it as shown on the left. It's the only electrical powered component attached to the carburetor, so it's usually not hard to spot. If you have a voltmeter you can measure the resistance across the leads of the choke. It should be somewhere in the region of around 10 or 20 ohms. If it's an open circuit, it's burned out and will need to be replaced. If it seems to be OK it may be stuck, or the wiring to it may have a problem. Check to see that it's getting voltage.